
anywidget: Jupyter Widgets Made Easy
anywidget is a Python library that makes it simple and enjoyable to create custom Jupyter Widgets that run in classic Jupyter notebooks, JupyterLite, JupyterLab, Google Colab, VS Code, and more. It focuses on:
- Prototyping*: Create custom widgets right within your notebook.*
- Portability*: Share widgets as Python scripts or pip-installable packages.*
- Productivity: Enjoy a modern front-end developer experience that supports real-time updates and removes manual project setup and other boilerplate.
Skip ahead to see an example.
Why making widgets is hard
Jupyter Widgets enrich notebooks with interactive JavaScript-based views and controls for Python objects in the Jupyter kernel. They enable a wide range of users, from students to professionals, to tailor their programming environment with custom or ready-made tools to interact with their programs and explore data. Consider a machine learning researcher adjusting model parameters with a slider or a computational biologist navigating a genome browser programmatically.
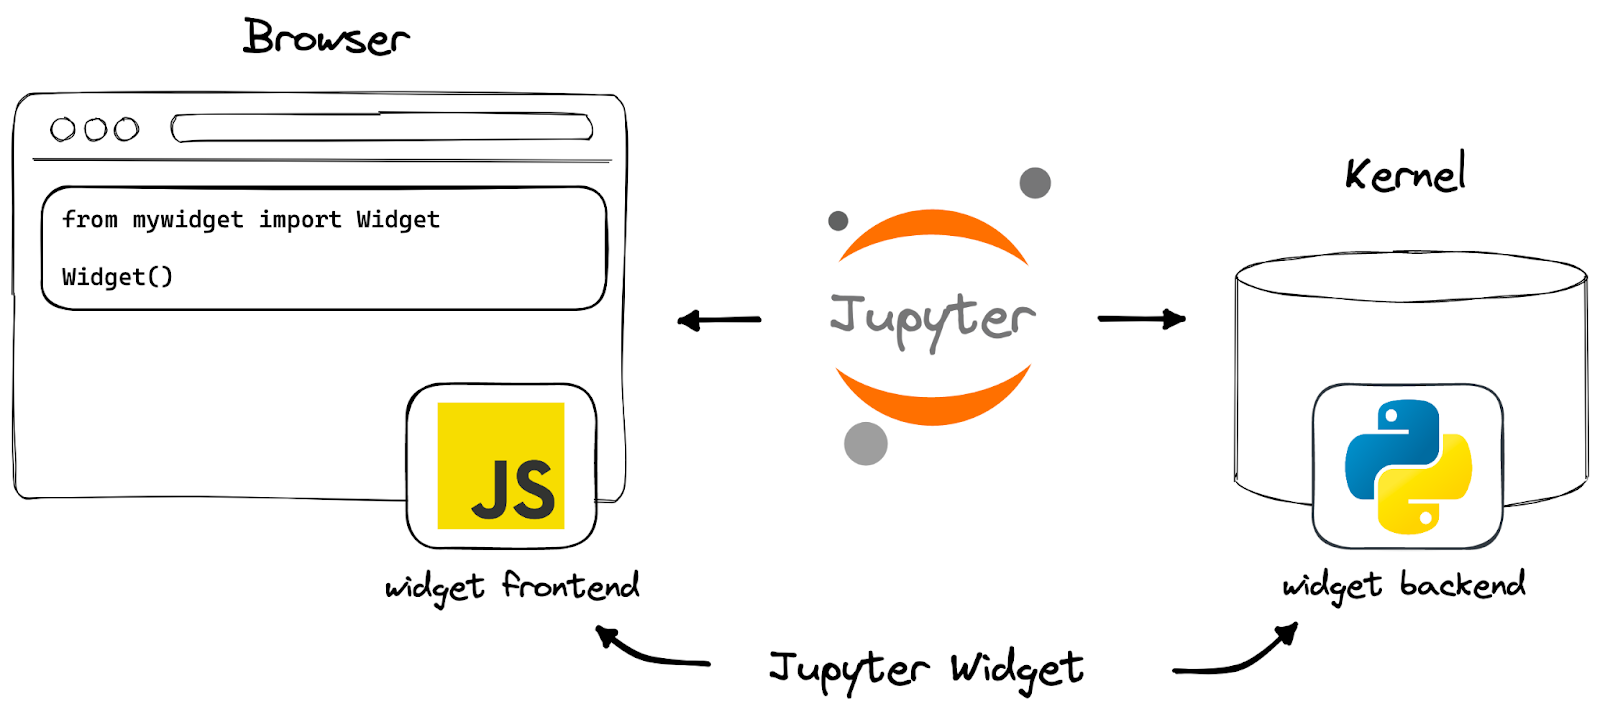
A useful feature of widgets is that they may be packaged and distributed as pip-installable modules, offering reusable components to address both general and specialized needs. For example, the ipywidgets project provides basic elements like form controls and layout containers, while numerous community projects offer custom widgets for domain-specific tasks (e.g., bqplot, ipyvolume, ipyleaflet).
However, the growing number of Jupyter environments supporting .ipynb files complicates custom widget creation and sharing:
- Developers must individually adapt front-end code to meet subtle, often undocumented, requirements of each notebook platform.
- Basic prototyping involves setting up a local Python package and manually installing extensions.
- Proper widget distribution requires deep understanding of both Python and JavaScript packaging.
I’ve expanded on these challenges previously, but to put it simply: traditional widget development has a steep learning curve and maintenance is both error-prone and tedious.
A universal widget adapter
anywidget introduces a fresh approach for creating and sharing custom widgets. It lets you avoid traditional development complexities, simplifying the process and making it easier than ever to start building widgets.
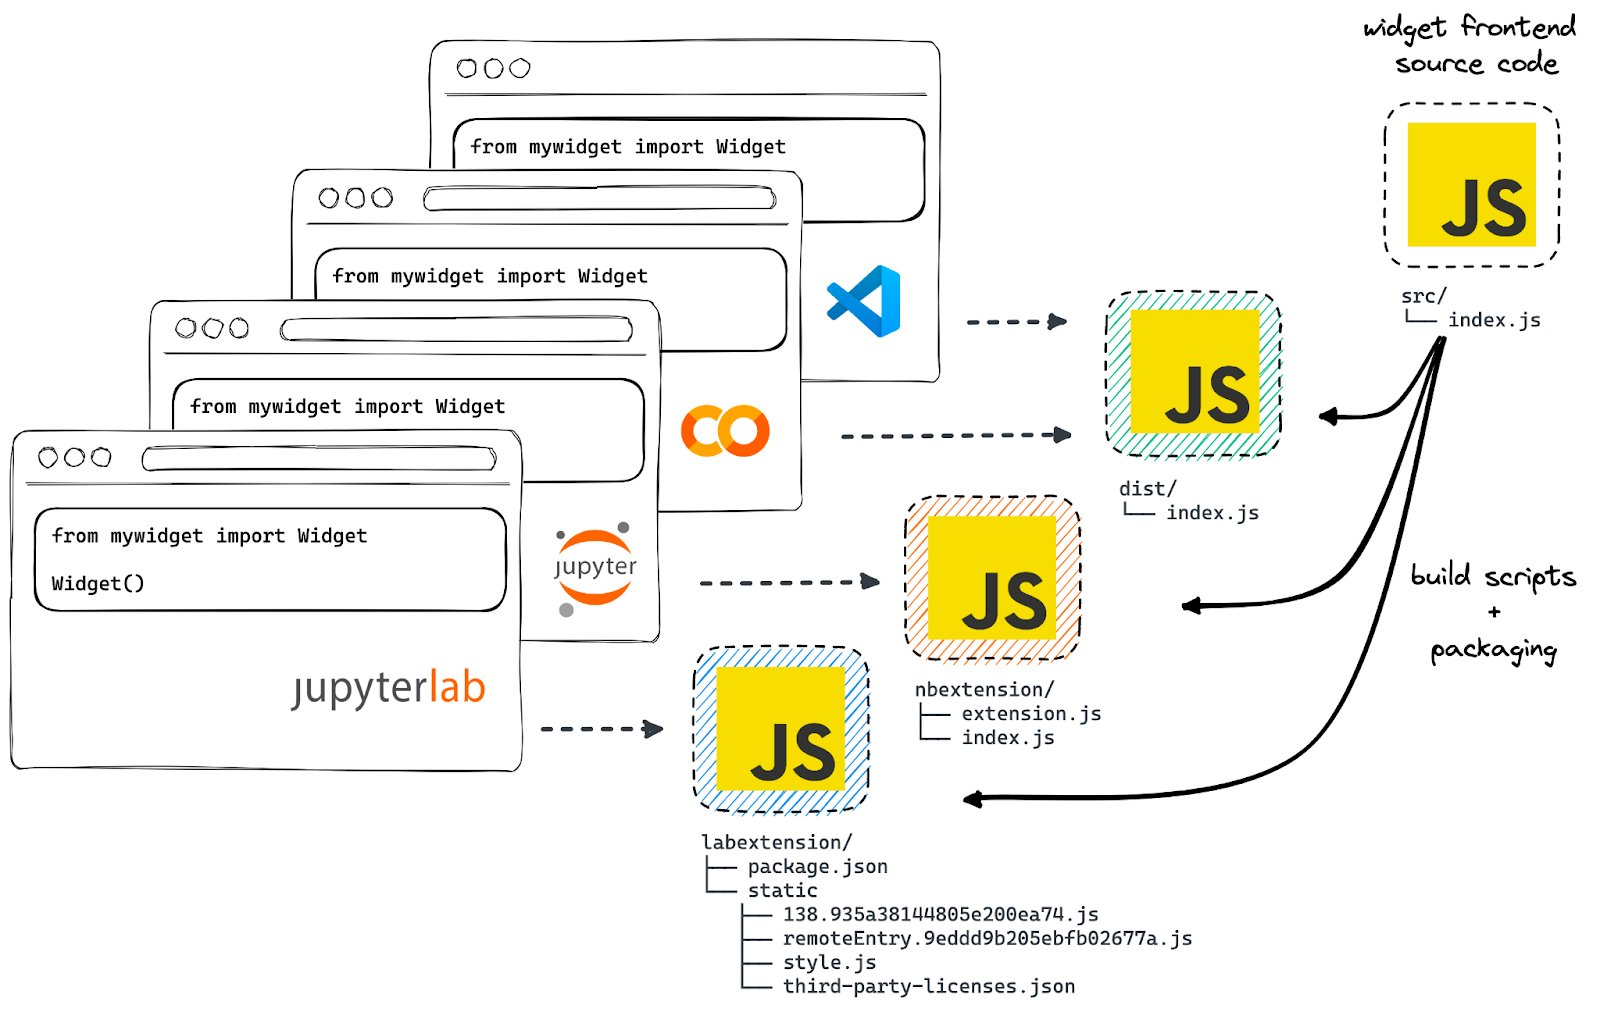
anywidget is not a new framework, but rather a compatibility layer around traditional Jupyter Widgets. It utilizes the standard module system now found in web browsers to let widget developers write front-end code that executes universally. Think of anywidget as an adapter that runs your widget’s JavaScript across various notebook environments.
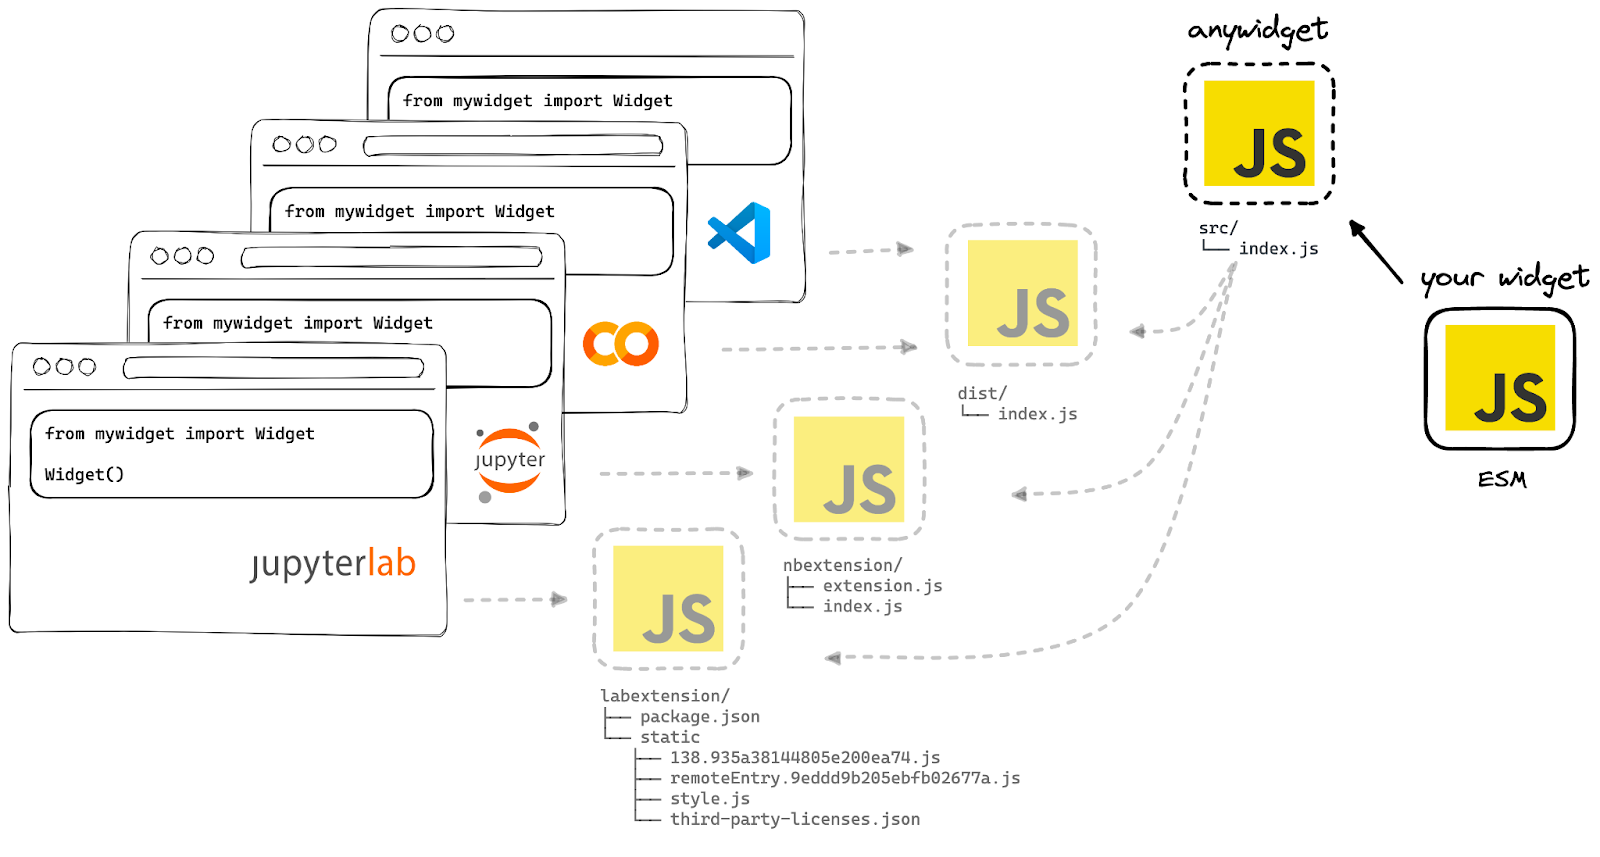
With anywidget, a custom widget consists of two components: a Python class and an ECMAScript module (ESM) — or web-standard JavaScript. You just write ESM and anywidget handles the platform-specifics quirks.
It takes less than 20 lines of code to recreate a simple “Hello World” widget.
import anywidget
import traitlets

class ExampleWidget(anywidget.AnyWidget):
    _esm = """
    export function render({ model, el }) {
        el.classList.add("custom-widget");
        function valueChanged() {
            el.textContent = model.get("value");
        }
        valueChanged();
        model.on("change:value", valueChanged);
    }
    """
    _css = """
    .custom-widget {
        background-color: lightseagreen;
        padding: 0px 2px;
    }
    """
    value = traitlets.Unicode("Hello World").tag(sync=True)

ExampleWidget()
You can copy and paste this code directly into Jupyter notebooks, JupyterLite, JupyterLab, Google Colab, or VS Code and it just works.
No installation, build configuration, or bundlers.
By comparison, creating an identical ExampleWidget the traditional way involves forking a Python repo template (including ~50 files), building JavaScript source code with Node.js and webpack, and manually installing the local extensions in classic notebooks or JupyterLab (not compatible with Google Colab or VS Code).
A realistic example
This tutorial demonstrates using anywidget to address a long-standing issue in the Altair: retrieving data from a brush selection back into Python. You can either follow along here or execute the notebook yourself in Colab.
We’ll begin with an interactive scatterplot example from the Altair docs:
import altair as alt
from vega_datasets import data

source = data.cars()
brush = alt.selection_interval()

points = alt.Chart(source).mark_point().encode(
    x="Horsepower",
    y="Miles_per_Gallon",
    color=alt.condition(brush, "Origin", alt.value("lightgray"))
).add_params(
    brush
)

bars = alt.Chart(source).mark_bar().encode(
    y="Origin",
    color="Origin",
    x="count(Origin)"
).transform_filter(
    brush
)

points & bars
Notice how the brush selection on the scatter plot filters the data in the linked bar chart. Neat, but unfortunately we are unable inspect the selected points because the selection is processed in JavaScript, and Altair lacks a mechanism to communicate back to Python.
Sounds like a job for a widget!
Behind the scenes, Altair produces JSON that follows the Vega-Lite visualization grammar. With anywidget, we can create a custom widget to render this validated JSON independently and additionally relay the JavaScript-based selections back to Python.
import anywidget
import traitlets

class ChartWidget(anywidget.AnyWidget):
    _esm = """
    import embed from "https://cdn.jsdelivr.net/npm/vega-embed@6/+esm";

    export async function render({ model, el }) {
        let spec = JSON.parse(model.get("spec"));
        let api = await embed(el, spec);
        api.view.addSignalListener(spec.params[0].name, (_, update) => {
            console.log(update);
            model.set("selection", update);
            model.save_changes();
        });
    }
    """
    spec = traitlets.Unicode().tag(sync=True)
    selection = traitlets.Dict().tag(sync=True)
What’s happening here? Our custom ChartWidget is defined by subclassing anywidget.AnyWidget:
_esm(line 6) defines the ECMAScript module for the widget. It imports necessary rendering dependencies (vega-embed) and exportsrender: a function to displays the Vega-Lite chart and (importantly) links the JavaScript-based selection to Python.specandselection(lines 19–20) define stateful properties via traitlets that are accessible by both client JavaScript and Python. These represent the Vega-Lite JSON specification and the JavaScript-based brush selection.
Now our ESM takes care of rendering instead of Altair.
chart_widget = ChartWidget(spec=(points & bars).to_json())

# Prints updates log console (JupyterLab: View > Show Log Console)
chart_widget.observe(lambda selection: print(selection.new), names=["selection"])

chart_widget
The original cross-filtering behavior stays the same, but now we have access to the JavaScript selection in Python via chart_widget.selection. The Python callback (line 4) prints the synchronized selection in the JupyterLab log console any time it changes.
Finally, we can present this data more effectively using a second widget that displays our selection as pd.DataFrame.
import ipywidgets

output = ipywidgets.Output()

@output.capture(clear_output=True)
def on_change(change):
    df = source
    selection = change.new
    for field, (lower, upper) in selection.items():
        df = df[(df[field] > lower) & (df[field] < upper)]
    display(df)

chart_widget.observe(on_change, names=["selection"])
ipywidgets.VBox([chart_widget, output])
The on_change callback (line 6) is invoked whenever the chart_widget.selection changes (line 13). It filters the original data based on the selection bounds and displays the given subset as a table within output.
With just a few lines of code, we enhanced Altair with new functionality using anywidget.
The ChartWidget can be shared in its current state. However, if we add more features, we could transition the JavaScript code from inline strings to separate files, gradually evolving the widget into a fully-fledged Python package. This incremental development is a feature of anywidget, allowing prototypes to grow into robust tools over time.
Modern web development meets Jupyter
anywidget further embraces modern JavaScript to reduce friction and make developing widgets more accessible and fun.
Because anywidget takes care of all the necessary plumbing, you no longer need to setup up a local Python package or manually install extensions to start building. Instead, you can prototype and share widget ideas directly from notebooks — just like regular Python scripts.
Since v0.2, anywidget allows you to use a file path to define your widget’s front-end code (i.e., the _esm and _css attributes). During development, anywidget will monitor for changes and immediately refresh the UI without requiring a full page reload or resetting widget model state.
import anywidget
import traitlets

class ExampleWidget(anywidget.AnyWidget):
    _esm = "index.js"
    _css = "styles.css"
    value = traitlets.Unicode("Hello World").tag(sync=True)
This feature has been popularized by modern web frameworks, but anywidget introduces it for the first time to Jupyter. See this real-time development workflow it in action or try it out yourself!
Try it out!
anywidget is available on GitHub and PyPI and may be installed via pip:
pip install "anywidget[dev]"
I hope using anywidget is simple and enjoyable. I have found it valuable in my work as a biomedical visualization researcher, and it’s been exciting to see the positive reception from the wider Jupyter community.
Since its release a few months ago, anywidget already been adopted by several notable projects:
- Mosaic: an extensible framework for linking interactive views to databases for scalable data processing.
- jupyter-scatter: interactive 2D scatter plots that scale to millions of points and support view linking.
- Mapwidget: interactive 2D/3D maps using popular JavaScript libraries with bidirectional communication, such as Cesium, Mapbox, MapLibre, Leaflet, and OpenLayers
- pyobsplot: a Python interface for Observable Plot that supports Pandas and Polars dataframes.
- ipyreact: a Python library for authoring Jupyter Widgets with React components.
… demonstrating its current viability as an alternative to traditional widget development. I am committed to maintaining the simplicity that defines anywidget while exploring ideas to further modernize widgets like:
- A simple decorator-based API
- Using builtin dataclasses or libraries like Pydantic or msgspec to define widget models and serialization logic
- Handling TypeScript and JSX for front-end code
If you’re curious about custom widgets or facing difficulties in widget development, please give anywidget a try and share your experience. Happy coding!
GitHub - anywidget: custom jupyter widgets made easy
I’d like to extend my gratitude to the numerous contributors to our documentation and specifically Talley Lambert for his work towards modernizing widgets from a Python perspective. He’s played a key role in developing our
experimentalAPI, which allows more flexible communication between JavaScript and Python without requiring ipywidgets.