
A User’s Journey with Plugin Playground: From First Idea to Installable JupyterLab Extension.
We are excited to announce the 1.0 release of JupyterLab Plugin Playground, allowing you to seamlessly experiment with the creation of Jupyter Notebook and JupyterLab plugins to add any functionality you may desire. To install:
pip install jupyterlab-plugin-playground
or use it from Binder or JupyterLite without installing anything by clicking one of these links: Binder (Lab), Binder (Notebook v7), JupyterLite (Lab), JupyterLite (Notebook v7).
Motivation
Building a JupyterLab extension has traditionally required setting up a complex local environment: installing dependencies from disjoint ecosystems (Node.js and Python), configuring tooling, and hunting down the right documentation. The goal of the Playground is to eliminate that setup overhead and streamline extension development. By bringing the runtime, documentation, and the context required for extension development into a single browser tab, you can go from idea to working extension without any local setup required.
Journey At a Glance
-
Start with a tiny extension idea that is easy to verify visually.
-
Choose a build path: Manual or AI-assisted.
-
Load and iterate inside JupyterLab until behavior is stable.
-
Build a second extension to prove the workflow is repeatable.
-
Share plugin files/packages for product and engineering review.
-
Export as a wheel(.whl) and validate installation in a clean Binder runtime.
-
Export as a zip and move the scaffold into a normal GitHub repository.
1.0: Pick Your Starting Path
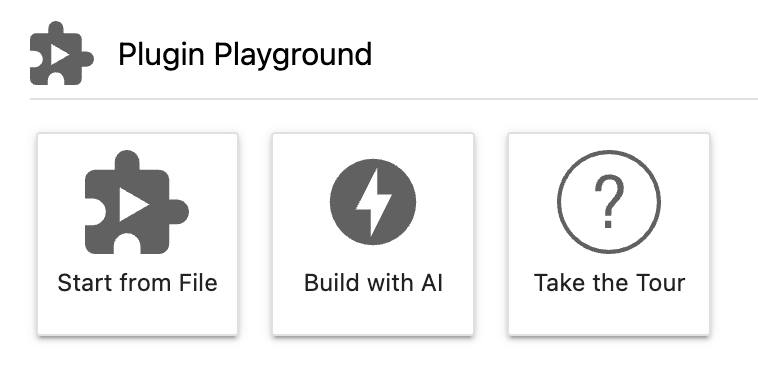
At the beginning, choose the path that matches your confidence level and speed needs. If this is your first time with Plugin Playground, you can optionally run Take the Tour from the Launcher or Command Palette for quick orientation before starting.
Start from FileIf you already know the APIs you need and want direct control.Build with AIIf you know the intended behavior but want a first draft quickly.
Both paths converge to the same shipping workflow later.
2.0: Build Extension #1 Manually
For the first pass, we will create something small and observable.
Our Goal: add a command named Toggle Right Sidebar to the command palette.
2.1: Create the plugin file
Launch Start from File. This comes with a dummy template.
import {
  JupyterFrontEnd,
  JupyterFrontEndPlugin,
} from '@jupyterlab/application';

const plugin: JupyterFrontEndPlugin<void> = {
  id: 'hello-world:plugin',
  autoStart: true,
  activate: (app: JupyterFrontEnd) => {

  },
};

export default plugin;
2.2: Fill the missing pieces using the right sidebar
Now build the plugin in order:
- In
Tokenssection in the right sidebar, searchICommandPaletteand click insert ( + icon ), so Plugin Playground adds token import and dependency wiring. - Add a simple command skeleton inside the activate function:
const commandID = 'my-first-playground-plugin:toggle-sidebar';
app.commands.addCommand(commandID, { label: 'Toggle Right Sidebar',
  execute: async () => {
      // place cursor here
  }
});
- In
Commands, searchapplication:toggle-right-area, place your cursor insideexecuteof the added command ( see above ) and useInsert in selectionThis adds at the cursor position:
app.commands.execute('application:toggle-right-area');
- Register the command in the palette:
commandPalette.addItem({ command: commandID, category: 'AAA' });
After those edits, your file should look like:
import { ICommandPalette } from '@jupyterlab/apputils';
import {
  JupyterFrontEnd,
  JupyterFrontEndPlugin,
} from '@jupyterlab/application';

const plugin: JupyterFrontEndPlugin<void> = {
  id: 'hello-world:plugin',
  autoStart: true,
  requires: [ICommandPalette],
  activate: (app: JupyterFrontEnd, commandPalette: ICommandPalette) => {
    const commandID = 'my-first-playground-plugin:toggle-sidebar';
    app.commands.addCommand(commandID, { label: 'Toggle Right Sidebar',
      execute: async () => {
          app.commands.execute('application:toggle-right-area');
      }
    });
      commandPalette.addItem({ command: commandID, category: 'AAA' });
  },
};

export default plugin;
- Uses the typed plugin template (
JupyterFrontEndPlugin<void>) and typedactivateparameters. ImportsICommandPaletteso the plugin can add entries to the Command Palette. - Registers a new command (
my-first-playground-plugin:toggle-sidebar) and executesapplication:toggle-right-areawhen your command runs. - Adds your command to the palette under the category
AAA.
2.3: Load it and verify behavior
Click Load Current File As Extension or click the run button in the toolbar, and open Command Palette.
When you run Load Current File As Extension, Plugin Playground compiles the active file and registers the plugin object into the live JupyterLab session. During iteration, if a plugin with the same id already exists, Plugin Playground attempts to deactivate and replace it so reload loops stay fast.
Expected result:
- Toggle Right Sidebar appears in the command palette ( open command palette by going through view -> Activate command palette or Press Accel + shift + C).

- Running it hides/shows the JupyterLab right sidebar.
3.0: Build with AI
If you want a faster draft, use AI assistance for the same extension workflow.
Goal: add the Show Active Notebook Cell Count command with a friendly no-notebook fallback.
3.1: Give AI a precise request
Use Build with AI and give a prompt:
for example, something like:-
Create a JupyterLab plugin named "active-notebook-cell-counter".
Add a command "Show Active Notebook Cell Count".
If no notebook is active, show a friendly dialog message.
If a notebook is active, show the current cell count in a dialog.
Register the command in the command palette under category "Playground Demo".
Export default plugin object.
What this block does:
This gives AI a concrete plugin goal, command name, and fallback behavior requirements.
3.2: Use AI + deterministic inserts together
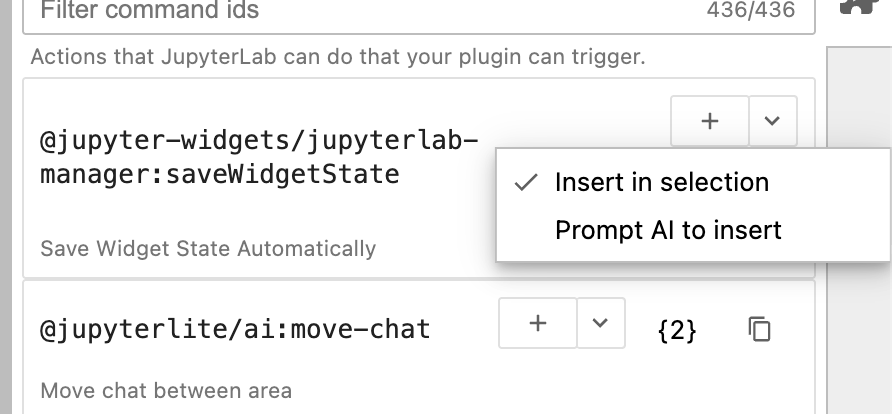
In the Commands tab:
-
Insert in selection for predictable boilerplate insertion.
-
Prompt AI to insert when placement context is tricky.
-
{n} when you need argument shape clarity ( Inspect the command signature before insertion: it shows expected argument names/types and return details).
Use Insert in selection for predictable snippets, and switch to AI when insertion location or code adaptation depends on the surrounding context.
4.0: Iterate Faster Before Handoff
Once the extensions run, enable Run on save(from the toolbar or from the settings) while polishing labels, command categories, and small behaviour details.
With Run on save, each file save triggers a reload loop for that plugin file, which makes label tweaks, command grouping changes, and message-copy iteration much faster than manual reload cycles. And with enabling the global setting (Load as extension on save), this behaviour is present for all files by default.

5.0: Share for Review
Before packaging, you can ask a teammate to review behaviour or just share links for the extension for a quick look using:
-
Share a single file when sharing is about one plugin file.
-
Share a package when your logic spans several files.
This keeps review lightweight: collaborators can inspect and discuss behaviour before you commit to repository structure, CI, and release wiring.
6.0: Export as Wheel and Validate in Binder
Now test as an installable artifact in a separate environment.
6.1: Export .whl
From the export dropdown ( in toolbar ), choose Export as Python package (.whl).
6.2: Install in Binder
-
Open JupyterLab on Binder.
-
Upload the downloaded wheel.
-
Open a terminal and run:
python -m pip install - force-reinstall ./your_exported_package.whl
What this block does:
Installs the wheel you just exported from Plugin Playground into Binder. (Uses — force-reinstall so Binder replaces any previously installed copy with your newest build). Then refresh JupyterLab and verify commands.
7.0: Export as Zip and Create a GitHub Repository
After runtime validation, move to normal engineering workflows.
7.1: Export .zip
Choose **Export as archive (.zip)** from the toolbar export dropdown.
7.2: Bootstrap repository
Unzip locally, create an empty GitHub repo, then run:
git init
git add .
git commit -m "Initial extension scaffold from Plugin Playground"
git branch -M main
git remote add origin https://github.com/<your-org-or-user>/my-jlab-extension.git
git push -u origin main
What this block does:
Initializes a new Git repository from the exported scaffold and creates an initial commit that captures the generated extension baseline.
Now your prototype is in a standard repo flow with PRs, CI, and release automation.
What’s Next
Plugin Playground is still evolving. We’re actively working on the LSP integration for JupyterLite to bring code intelligence autocomplete and diagnostics directly into the editor, an “Ask AI” button on log errors that lets you send error context directly into the AI chat for instant debugging help. In the future, we would like to explore git integration to snapshots every successful load, paired with a built-in diff viewer to compare any snapshot against your current file. If you have any suggestions or encounter any problems, please let us know by opening an issue on GitHub.
Acknowledgements
We are grateful to the Jupyter Foundation and its members for sponsoring the development of Plugin Playground as part of Community Funding Proposals 2025.
We thank Jeremy Tuloup, Nick Bollweg, and Nicolas Brichet for providing inspiration, review, and advice across our work on the plugin and its dependencies. Finally, this work would not be possible without the authors of earlier iterations of Plugin Playground.
About the Developers
Anuj Singh is an OSS intern at OpenTeams. Anuj implemented Plugin Playground v1.0.0 and contributed to its dependencies during his internship at OpenTeams.
Smera Goel is a UI/UX designer at Quansight. Smera contributed to the user experience and design direction of Plugin Playground.
Michał Krassowski is a Senior Software Engineer at OpenTeams. Mike provided guidance and direction for the development of the Plugin Playground.
Further reading
- Blog post on how and why we integrated AI functions in the playground extension
- Changelog
- Documentation